Indoors, a quiet green project can already be taking shape on the windowsill.
While most gardens look asleep, winter is actually a strategic window for anyone dreaming of homegrown sweet potatoes. With a couple of supermarket tubers, some toothpicks and a bit of warmth, you can start the plants now and give yourself a serious head start for spring.
Why winter is the secret season for sweet potatoes
Sweet potatoes need heat and a long growing period, which makes them tricky in cooler climates. Waiting until May to think about them often means a disappointing harvest.
Starting them indoors in winter changes the game. Instead of planting whole tubers in the ground, gardeners grow “slips” – young shoots with tiny roots – that will later be transplanted outside once the soil has warmed.
By turning a single winter tuber into several strong slips, you set yourself up for earlier planting and a heavier spring harvest.
These slips are more vigorous than tubers planted directly in the soil and adapt faster when moved outdoors. They also let you multiply the number of plants without buying specialist seed stock.
Choosing the right sweet potatoes: not all tubers are equal
The process starts with selection. A tired, treated tuber will struggle; a healthy one responds quickly to warmth and light.
- Pick firm, unshrivelled sweet potatoes without soft spots or mould.
- Favour organic tubers, which are less likely to have been treated with sprout inhibitors.
- Look for tiny buds or dark “eyes” on the skin: these are potential growth points.
- If you have a choice of varieties, go for early, productive types such as Georgia Jet or similar quick-maturing lines.
During washing, many beginners make the same mistake: scrubbing too hard. Those small dark specks or slightly rough patches along the skin are where new growth will emerge. Removing or damaging them slows or even stops sprouting.
Handle the skin gently: the little dark spots are future stems, not imperfections to erase.
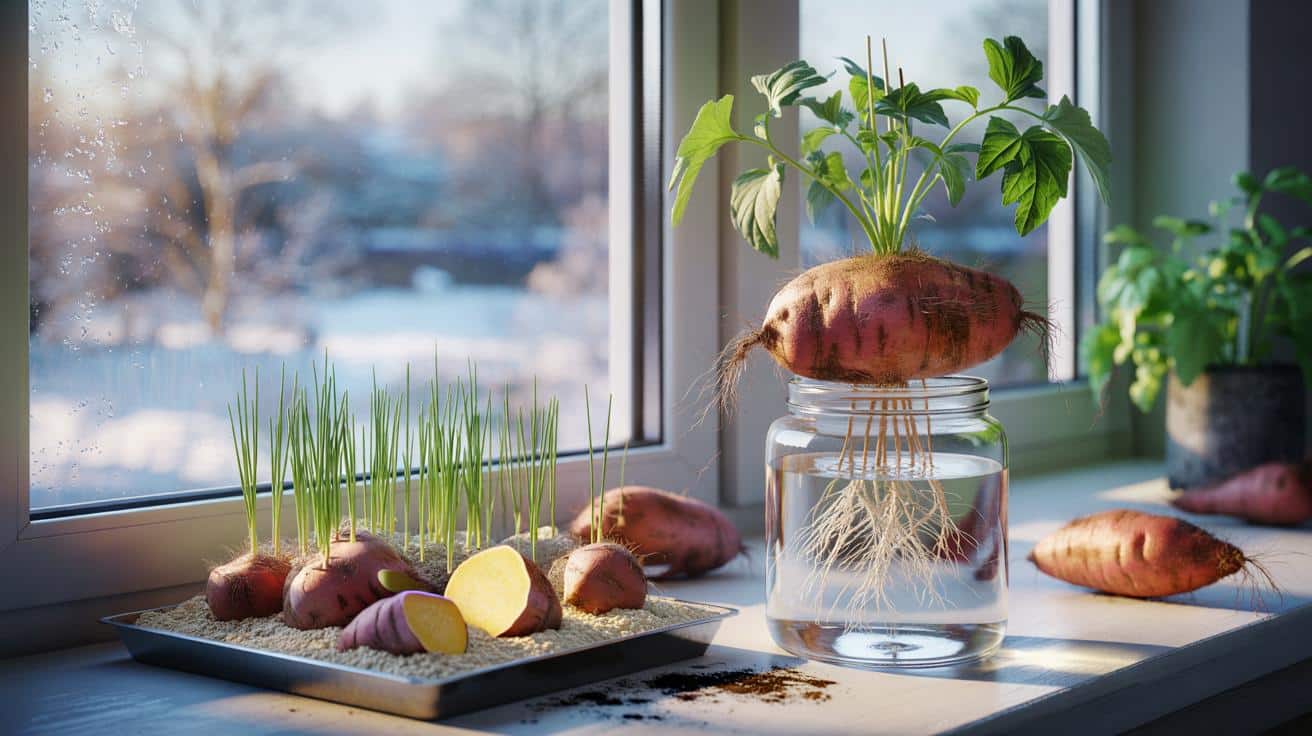
How to sprout a whole sweet potato in water
The classic method uses nothing more complicated than a glass jar and some toothpicks. It works especially well if you only need a handful of plants.
➡️ “I’m a hairdresser and here’s my best advice for 50-year-old women who want short hair”
➡️ US Space Command Taps SpaceX for Missile Warning, Tracking Satellites
➡️ MBDA Brings Its Thundart Rocket Out Of The Shadows For The French Army
Setting up the jar
Identify the pointed end of the tuber: this is usually where the root was. The fatter, more rounded end is the top, which tends to produce most shoots.
Push three or four toothpicks around the middle of the tuber to create a “collar” that will rest on the rim of a jar or glass. Then:
- Place the tuber in the jar with the pointed end facing down.
- Fill with water so that roughly 70% of the sweet potato is submerged.
- Keep the upper third, where many eyes are, above the waterline.
Warmth and light are crucial. A bright room kept around 20–25°C suits sweet potatoes very well. Some growers simply stand the jar on a radiator shelf or above underfloor heating, checking that the water doesn’t overheat or evaporate too fast.
Think of it as indoor hydroponics on a shoestring: stable warmth, clean water and bright light are all you need.
Day‑to‑day care of the sprouting jar
Within a couple of weeks, fine white roots usually appear in the water, followed by small green shoots on the exposed part of the tuber.
To keep everything healthy:
- Top up the water regularly so the base never dries out.
- Change the water every few days to limit odours and bacterial build-up.
- Rotate the jar so all sides receive some light and the stems don’t lean too far.
As the slips reach 10–15 cm and start forming their own tiny roots at the base, they can be gently twisted or cut from the mother tuber and potted individually. Each one becomes a future plant for the garden or a large container.
Multiplying plants by cutting the tuber into pieces
Gardeners who want a larger patch often turn to a more economical technique: slicing a single sweet potato into several chunks and rooting them in compost rather than water.
Preparing the pieces
Using a clean knife, cut the tuber into sections, each with several eyes. Aim for pieces a few centimetres thick so they don’t dry out too quickly.
Each piece can generate multiple slips, which means one good-sized sweet potato can easily yield six to eight young plants or more. This cuts costs and lets you work with a favourite variety even when planting stock is limited in shops.
Using compost to raise sturdy slips
Place the slices in a shallow tray filled with fine, light compost:
- Lay the flesh side in contact with the compost.
- Keep the skin facing upwards where the shoots will appear.
- Press lightly so the pieces sit snugly but are not buried.
Moisten the compost so it is evenly damp, never waterlogged. Air spaces in the growing medium let oxygen reach the forming roots and stem bases, reducing the risk of rot.
The goal is constant, gentle moisture – like a wrung‑out sponge, not a flooded basin.
To create a warm, humid microclimate, cover the tray with a clear lid, a plastic dome or even a loose sheet of transparent film. Leave gaps or open the cover daily so fresh air can circulate. Without this ventilation, mould and fungal problems appear quickly on both compost and tuber skin.
After a few weeks, green shoots push through. Once they stretch to around 15 cm and show small roots at their base, treat them like the slips from the jar method: separate them and pot them up individually in fresh compost.
From winter window ledge to spring planting
By late spring, when night frosts have passed and the soil has warmed, these indoor-raised slips are ready for life outside. Plant them into rich, loose soil or spacious containers, spacing them generously so their vines can sprawl.
Because their life began months earlier, these plants settle quickly and can start bulking up tubers sooner than shop-bought starts planted at the last minute.
| Stage | Approximate timing | Main task |
|---|---|---|
| Winter (Jan–Feb) | Weeks 1–4 | Start tubers in water or compost, maintain warmth |
| Late winter | Weeks 4–8 | Slip growth, regular watering, first separations |
| Early spring | Weeks 8–12 | Pot slips individually, keep frost-free and bright |
| Late spring | After last frost | Plant slips outdoors in beds or large containers |
Practical tips, risks and how to avoid them
Several small decisions make the difference between strong slips and a frustrating, mouldy tray.
- Cold rooms: If indoor temperatures drop below 18°C for long periods, sprouting slows dramatically. A heated propagator or a consistently warm shelf helps.
- Too much water: Standing the pieces in soggy compost or murky jar water encourages rot. Drain excess water and refresh jars often.
- Low light: In a dark corner, slips become pale and floppy. A bright window or a basic grow light keeps growth compact and sturdy.
- Overcrowding: Letting too many slips develop on one chunk exhausts it. Thin them out so each plant has space and resources.
For those new to this, “slip” is a useful term to understand. It simply refers to a young sweet potato plant grown from a vegetative cutting, not from seed. While a typical potato can be planted as a chunk directly in the soil, sweet potatoes respond better to this slip system, which suits their tropical origins.
Related winter projects for keen growers
This kind of slow, steady propagation fits well with other winter gardening activities. While sweet potatoes are rooting, many people sow hardy salad leaves on a windowsill, regrow spring onions from supermarket leftovers, or start herbs such as basil indoors in small pots.
Some even treat it as an informal experiment: one tuber in water, another in compost, or different spots in the house with slightly different temperatures. Keeping a simple notebook of dates, room locations and results helps refine the method year after year.
Winter may feel quiet outside, but on a bright shelf indoors, next season’s harvest is already getting organised.