January often feels like a gardening blackout, yet what you do now can decide whether your hydrangeas bloom generously or sulk in silence once the warm weather returns.
January is decision time for next summer’s blooms
By mid-January, winter has fully settled in and hydrangeas look like bare, lifeless sticks. Many people ignore them until March. That’s exactly when the damage is done.
Most traditional garden hydrangeas (Hydrangea macrophylla, the big mophead and lacecap types) form their flower buds on wood produced the previous year. Those buds sit exposed along the stems, waiting for spring. A sudden cold snap can kill them outright.
Hydrangeas themselves cope with winter, but their flower buds are fragile. Protect the buds, and you protect your future flowers.
Temperatures that plunge after a mild spell are particularly harsh. The plant thinks spring is coming, sap begins to move, then a hard frost bites into unprotected buds and shallow roots. The shrub may still leaf out, but the floral show is gone.
This is why careful gardeners treat mid-winter not as a dead season, but as a window for quiet, strategic action.
Forget the pruning shears: the real work happens at ground level
One of the most persistent misconceptions is that hydrangeas should be pruned in deep winter. For most classic varieties, that’s the fast lane to a flowerless summer.
Those “dead” flower heads on top of each stem act like little helmets. They offer a bit of protection to the buds sitting just below. Cutting them off in January leaves the upper buds fully exposed to frost and opens fresh wounds on the stems.
The crucial winter gesture is not pruning, but insulating the base and roots of the plant.
➡️ Germany orders 200 Puma IFVs with Spike anti-tank missiles for $4.9 billion
➡️ “I’m a hairdresser and here’s my best advice for 50-year-old women who want short hair”
➡️ Rheinmetall receives major order for HERO loitering munitions
➡️ An ‘ingenious’ Ukrainian weapon so disruptive NATO fears it more than Russia does
➡️ MBDA Brings Its Thundart Rocket Out Of The Shadows For The French Army
➡️ Heating: the 19°C rule is over, here is the experts’ recommendation
Cold soil can be just as destructive as cold air. When frost penetrates deep into the ground, it hits the fine surface roots that hydrangeas rely on for moisture and nutrition. The shrub often survives, yet it spends months rebuilding root and stem growth instead of funnelling energy into flowers.
The aim in winter is simple: build a protective, insulating layer over the root zone. Think of it as fitting your hydrangeas with a thick winter coat.
The “plant armour” professionals use: natural materials you already have
You don’t need fleece covers, plastic domes or expensive garden gadgets. The most effective protection usually comes from the garden itself.
The idea is to copy what happens on a forest floor: branches above, and a deep, soft mattress of organic matter below. That layer keeps roots warmer, steadier and slightly moist.
Best materials for a winter mulch
- Fallen leaves: Free, abundant and perfectly effective. Oak and beech leaves break down slowly, so they protect for longer.
- Pine bark: Holds in warmth and, over time, gently acidifies the soil, which can intensify blue tones in some hydrangeas.
- Straw or hemp straw: Traps air between the stems, creating strong insulation against temperature swings.
- Dried fern fronds: Common near woodland edges, they shed water well and contain minerals that feed the soil as they decay.
Many gardeners mix two or three of these to balance insulation, appearance and long-term soil improvement.
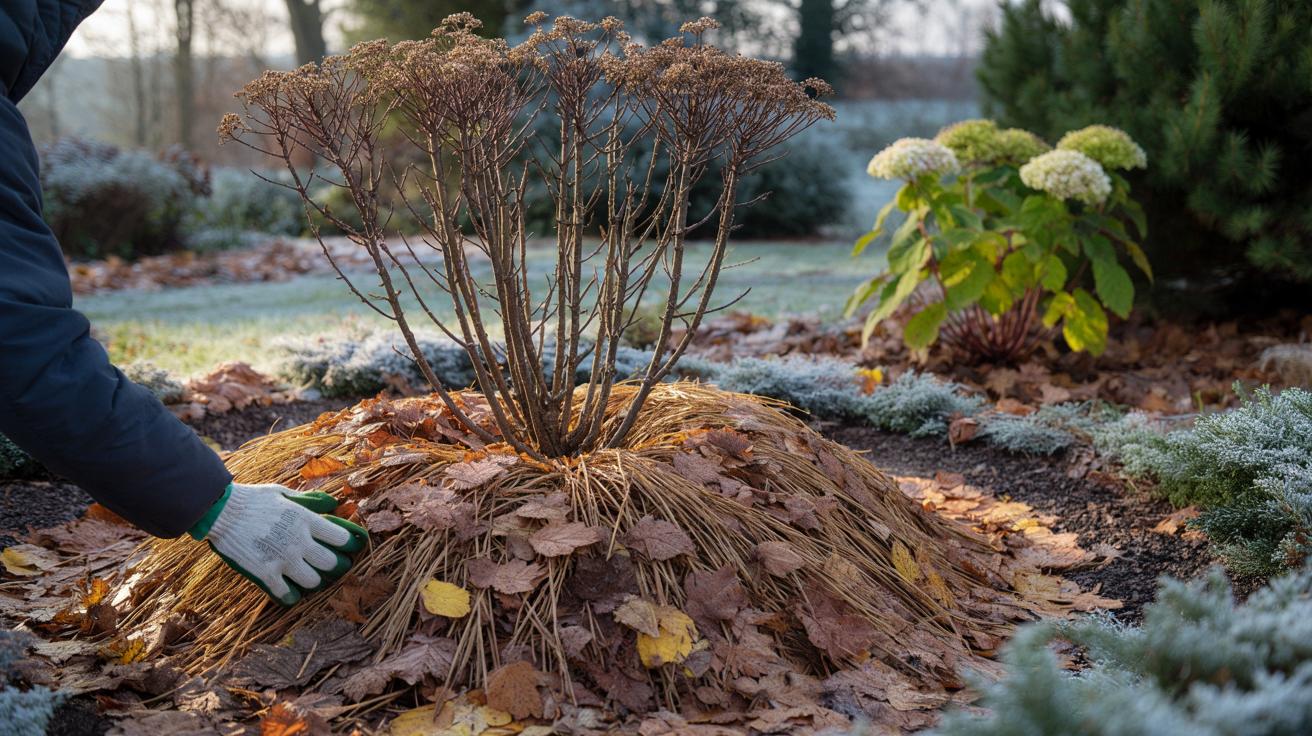
How to build the perfect winter blanket without smothering the plant
The protective layer, often called a winter mulch, only works when it is applied thickly enough and in the right place. Tossing a handful of leaves around won’t change much.
A 10–15 cm (4–6 inch) layer around the base creates a real barrier against penetrating frost.
Step-by-step: winter mulching for hydrangeas
| Step | What to do |
|---|---|
| 1. Light clean-up | Remove weeds and debris at the base with your hands, without digging or scraping the soil surface. |
| 2. Position the mulch | Spread your chosen material in a wide ring, from the main stems out to just beyond the drip line of the plant. |
| 3. Build thickness | Gradually add material until the layer reaches at least 10 cm deep, ideally 15 cm in colder regions. |
| 4. Keep a breathing gap | Leave 1–2 cm of space around each main stem so moisture does not sit directly against the bark. |
Resist the urge to press the mulch down hard. The trapped air between leaves, straw or bark chips is what makes the layer insulating. If you compact it, you lose much of that effect.
This “mattress” shelters the low buds at the base of the stems and the fine feeder roots. Those buds often become the strongest flowering shoots in summer.
Why this winter gesture pays off twice: flowers and soil health
Protection from frost is only half the story. Once winter eases and soil temperatures rise, that thick layer begins to change character.
Fungi, bacteria and earthworms gradually pull bits of the mulch down into the soil. It breaks apart, darkens and turns into humus: the crumbly, rich material that gardeners prize.
By late spring, yesterday’s winter coat becomes tomorrow’s compost, feeding the plant from the roots up.
Hydrangeas are heavy feeders, especially when they are pushing out dozens of flower heads. A soil rich in organic matter holds more nutrients and water, which means less stress for the plant during dry periods, and fewer sudden droops in hot weather.
The mulch left in place into summer also shields the soil from the sun, cutting evaporation. In practice, that means you water less and the plant faces fewer ups and downs in moisture levels, a common cause of poor flowering and leaf scorch.
Choosing the right approach for your garden and climate
Not every hydrangea responds in the same way to cold. Bigleaf types need the most protection, while some modern varieties (often labelled as blooming on “new wood” and “old wood”) cope better with winter pruning and frost.
In mild coastal areas, a thinner mulch may be enough. Inland or in continental climates where late frosts hit hard, a deeper layer and wider coverage make a real difference. Gardeners in very cold regions sometimes add a loose “collar” of straw higher up around the base of the stems during severe cold spells, then remove it once temperatures lift.
Common mistakes that cost you flowers
Even experienced gardeners fall into a few traps that limit hydrangea performance. Three come up repeatedly:
- Hard winter pruning of old-wood varieties: Cutting stems low in January removes most of the flower buds that formed the previous summer.
- Mulch piled against stems: Constant moisture at the collar of the plant encourages rot and fungal disease.
- Too thin a layer: Anything under about 5 cm rarely protects roots from a serious freeze.
A simple way to test your mulch depth is to push your fingers through it until you touch soil. If you see more than two finger joints exposed, you probably need more material.
Hydrangea jargon, decoded for real gardens
Two terms on plant labels often confuse buyers: “flowers on old wood” and “flowers on new wood”. For winter care, that distinction matters.
“Old wood” means the plant sets flower buds on stems grown the previous season. If frost or pruning destroys those stems, you lose most of the blooms for that year. Classic mophead and lacecap hydrangeas usually fall into this category.
“New wood” flowering hydrangeas produce buds on stems that grow in the same spring. These are more forgiving of both cold and pruning. They still benefit from winter mulching for root protection, but you can be bolder with cutting back.
What happens if you skip the winter gesture? A realistic scenario
Picture two identical hydrangeas in neighbouring gardens during a sharp late-January frost. One has a 15 cm ring of leaf mould and bark around its base. The other stands in bare, compacted soil.
After a night at -8°C, the air has treated both plants the same. Yet in the protected border, the soil a few centimetres down is only just below freezing. Buds at the base stay viable, roots remain active enough to bounce back quickly. In the unprotected bed, frost bites deeper. Fine roots die back, low buds blacken, and in spring the plant spends its energy simply rebuilding.
By July, the difference is obvious: one shrub is dense, green and peppered with flower heads. The other is leafy, but sparse and shy with colour. Both survived winter; only one had the quiet advantage of that winter gesture.
A quarter of an hour in the cold, armed only with a rake and a pile of garden debris, is often all it takes to decide which of those two plants your own hydrangeas resemble when spring finally arrives.